TIPS
Connect Claude Code to Blender: a step-by-step setup for non-technical users
A ten-minute walkthrough to wire Claude Code into Blender via the free Blender MCP bridge, so you can build 3D scenes by describing them in plain English.

If you have ever wanted to build a 3D scene by typing what you want, rather than by clicking through menus for an hour, this is for you. Blender is the world's most popular free and open-source 3D software. Claude Code is Anthropic's command-line AI assistant. There is now a small, free bridge between them called Blender MCP, built by the developer Siddharth Ahuja and published under an MIT licence on GitHub.
With about ten minutes of setup, you can sit in front of Blender and say things like "create a low-poly dungeon scene with a dragon" or "make this car red and metallic". Claude reads your scene, writes the necessary Blender operations, and runs them live in the viewport.
This walkthrough is written for readers with no programming background. You will be asked to copy and paste two or three commands into a terminal. Nothing scary. Total time: ten to fifteen minutes for a first-time install.

Blender is free, open-source 3D software used by studios, indie creators and educators worldwide. Photo: Andrey Metelev / Unsplash.
What you will need
- Blender 3.0 or newer. Free from blender.org/download. Version 4.x is recommended.
- Python 3.10 or newer. Most modern Macs and Windows machines already have it. You will not write any Python yourself.
- Claude Code. The terminal-based version of Claude. Install instructions are in the official Claude Code docs.
- A terminal application. On macOS that is Terminal. On Windows it is PowerShell. On Linux, your usual shell.
That is the whole list. No paid accounts, no API keys to fiddle with.
Step 1: Install the uv package manager
uv is a small, fast tool that knows how to download and run Python programs. Blender MCP uses it under the bonnet. You only install it once.
On macOS, open Terminal and paste:
brew install uv
If you do not have Homebrew, use the universal installer instead:
curl -LsSf https://astral.sh/uv/install.sh | sh
On Windows, open PowerShell and paste:
powershell -c "irm https://astral.sh/uv/install.ps1 | iex"
Then close and reopen PowerShell so the new tool is picked up.
On Linux, run:
curl -LsSf https://astral.sh/uv/install.sh | sh
To confirm it worked, type uv --version. You should see a version number. If you do, move on.
Step 2: Tell Claude Code about Blender
Claude Code uses something called the Model Context Protocol (MCP). Think of MCP as a universal adapter that lets Claude talk to other software safely. You will now register Blender as one of those connections.
In the same terminal window, run a single line:
claude mcp add blender uvx blender-mcp
That command does three things in the background. It downloads the latest Blender MCP package, registers it with Claude Code under the name "blender", and tells Claude how to start it when needed.
If you see a message like Added MCP server "blender", you are done with this step.
If you get an "unknown flag" or "command not found" error, you may be on an older Claude Code. Update it with
claude updateand try again.
Step 3: Install the Blender add-on
This is the side that lives inside Blender itself. The add-on is a single Python file.
- Open github.com/ahujasid/blender-mcp in your browser.
- Find the file called
addon.pyin the file list. - Click on the file, then click the Download raw file button (the small download icon on the right).
- Save
addon.pysomewhere you will remember, for example your Downloads folder.
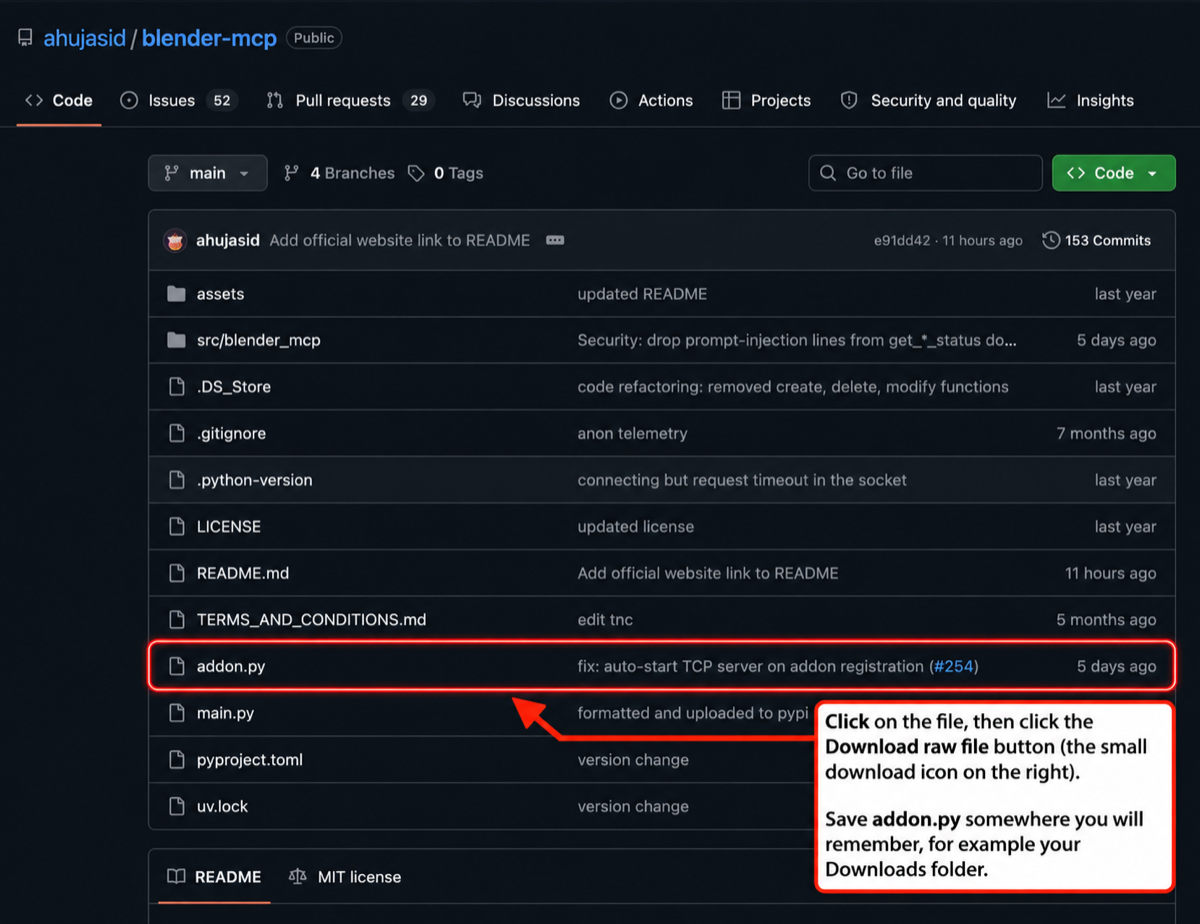
The addon.py file lives in the root of the ahujasid/blender-mcp repository. Click the file, then click the small download icon on the right to save the raw file.
Now open Blender and follow these clicks:
-
Top menu: Edit → Preferences.
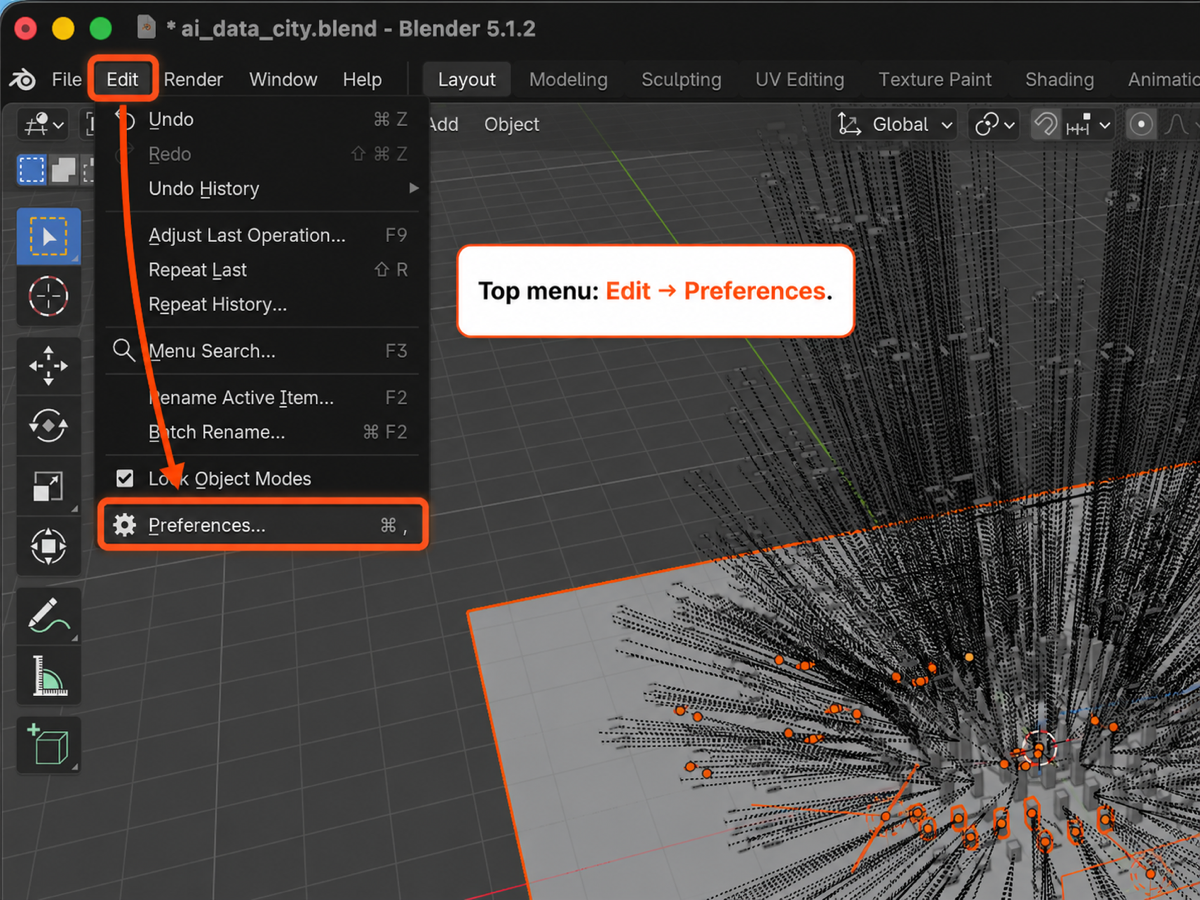
In Blender's top menu, click Edit, then Preferences... at the bottom of the dropdown.
-
In the dialog that opens, click Add-ons on the left.
-
Top right of that panel: click Install... (or the small dropdown arrow then Install from Disk, depending on your version).
-
Navigate to the
addon.pyyou just saved and select it.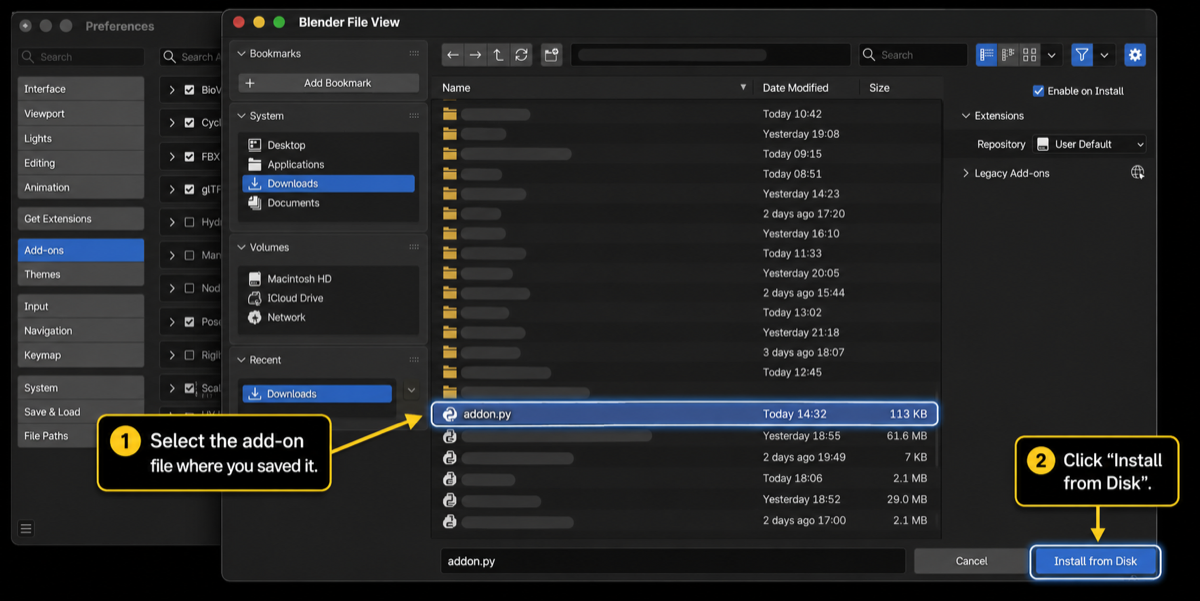
In the Blender File View, navigate to where you saved addon.py (your Downloads folder if you followed step 4 of the download section), select the file, then click Install from Disk on the right.
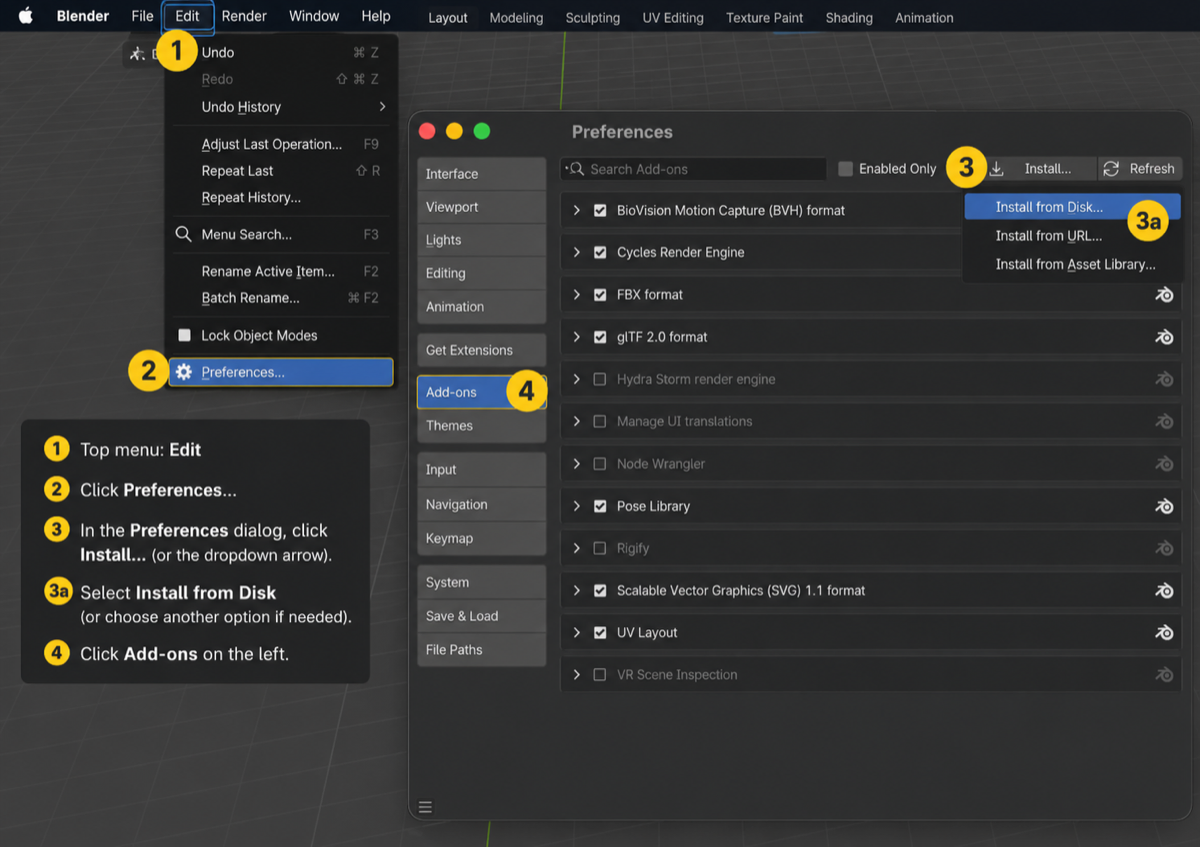
The full flow inside Blender Preferences, numbered in order: open the Edit menu, click Preferences..., choose Install from Disk (top right, or via the dropdown arrow), then select Add-ons on the left.
-
Back in the Add-ons list, type Blender MCP into the search box. You will see an entry called Interface: Blender MCP.
-
Tick the checkbox next to it. The add-on is now active.
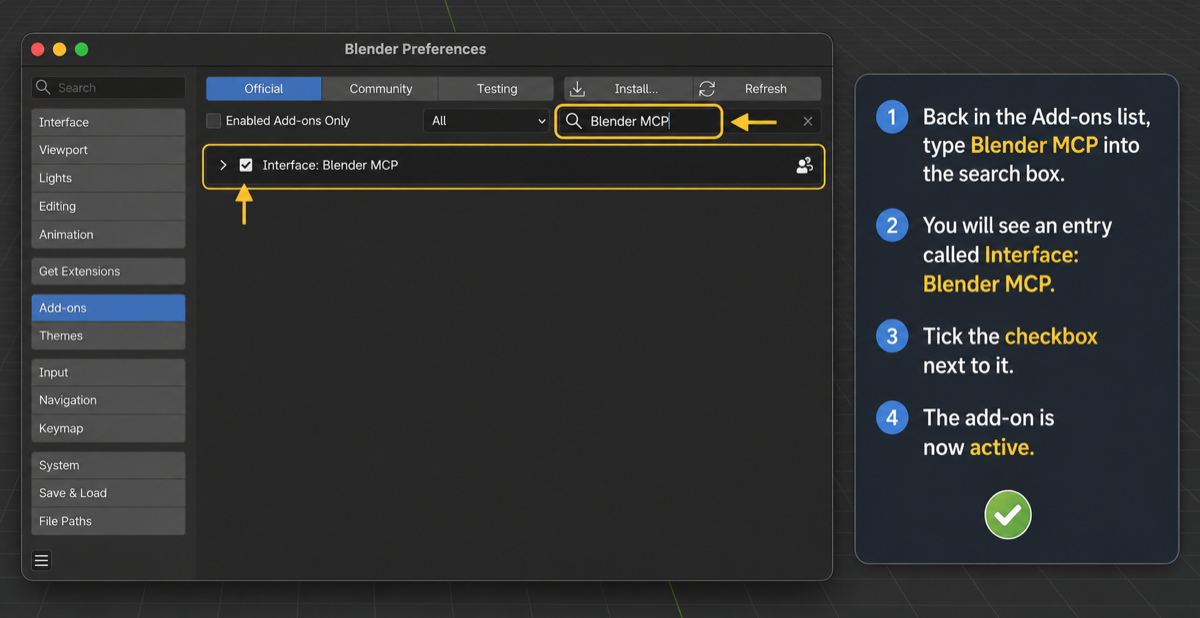
In the Add-ons panel, type Blender MCP in the search box, find Interface: Blender MCP, and tick its checkbox to activate the add-on.
You can close Preferences.
Step 4: Start the connection inside Blender
You should be back in the normal Blender 3D viewport. Look at the right edge of the viewport. There is a thin vertical strip with a small arrow.
- Press the N key on your keyboard (with your mouse hovering over the 3D viewport). A sidebar slides out.
- In that sidebar, find a tab called BlenderMCP. Click it.
- You will see a checkbox for Use Poly Haven assets. This is optional. Tick it if you want Claude to be able to pull free textures and HDR environments from Poly Haven.
- Click the big button labelled Connect to Claude.
You should see a small status message confirming the server has started. That is the Blender side waiting for Claude to call.
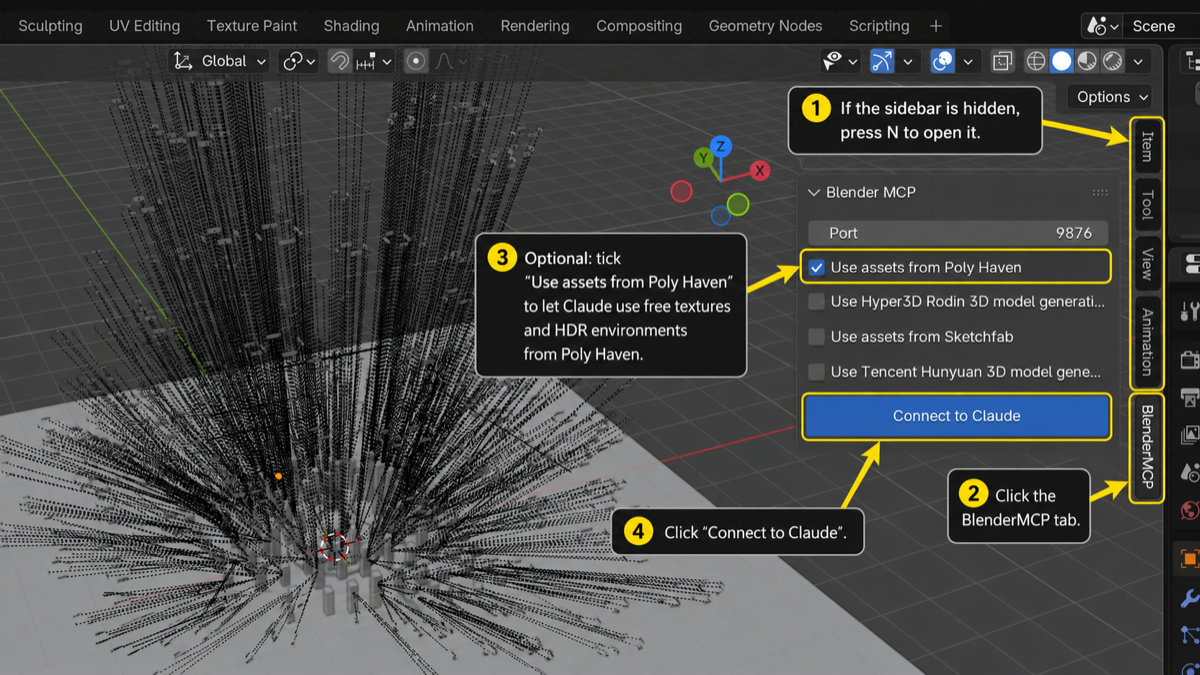
The full Step 4 flow inside Blender: press N to open the sidebar, click the BlenderMCP tab on the right edge, optionally tick Use assets from Poly Haven, then click the big Connect to Claude button.
Step 5: Send your first prompt
Open a new terminal window (leave Blender open in the background). Go to a folder you do not mind being a working directory, for example your Desktop, and start Claude Code:
cd ~/Desktop
claude
You will land in an interactive Claude prompt. Try something simple first:
Create a sphere above the default cube and make the sphere bright orange.
Claude will think for a few seconds, you will see it call the blender tool, and the scene in your Blender viewport will update live. The first command sometimes appears to do nothing, which is a known quirk: just send a second message and it will catch up.
Once you trust it, try something more ambitious:
Build a low-poly desert scene with three cacti, a small adobe house and a dramatic sunset light. Add a camera looking at the house from a low angle.

A low-poly scene like this used to be a forty-minute exercise. With Claude driving Blender, it is a one-sentence prompt. Photo: ZHENYU LUO / Unsplash.
Common problems and quick fixes
| Symptom | Likely cause | Fix |
|---|---|---|
| Claude says it cannot find the Blender tool | The add-on is installed but you did not click Connect to Claude | Press N in Blender, open the BlenderMCP tab, click the Connect button |
| First prompt seems to be ignored | Known one-off quirk on the very first command | Send a second prompt; subsequent ones work fine |
| Connection refused | The connector and Claude got out of sync | Click Disconnect in Blender, wait two seconds, click Connect again |
| Poly Haven downloads fail | The Poly Haven checkbox is not enabled, or your prompt is too vague | Tick the box in the N-panel and ask specifically, for example "download a forest HDRI from Poly Haven" |
uv: command not found on Windows |
The installer did not add uv to your PATH |
Close PowerShell, reopen it, run uv --version again. If still missing, add the path printed by the installer to your system PATH manually |
A few habits worth forming
- Save your Blender file before each big prompt. Claude can make sweeping changes, and Blender's undo stack is not infinite. A quick Ctrl+S (or Cmd+S on Mac) before each instruction means you can always roll back.
- Be specific about scale. Blender's default units are metres. If you ask for "a small house", you may get a five-metre cube. Ask for "a 2-metre tall house" instead.
- Break complex scenes into stages. One prompt for the terrain, one for the buildings, one for the lighting. You will get better results than one giant prompt.
- Only run one connection at a time. Do not open the BlenderMCP tab in two Blender windows at once.
Why this matters
Blender MCP is one of the clearer demonstrations of where AI assistants are heading: not as a chatbot in a sidebar, but as a co-operator inside the tools you already use. The same MCP plumbing now exists for Figma, GIMP, Unreal Engine and a long list of others. Once you have set one up, the rest follow the same pattern: install a tiny bridge, register it with Claude, start the connection from inside the host application.
For students, educators and small studios in the UK, that means a meaningful portion of 3D production work, the dull bits in particular, can now be driven by description rather than by mouse-and-menu archaeology.
Sources
- ahujasid/blender-mcp on GitHub, MIT licence, 22.5k stars (accessed 8 June 2026).
- Blender MCP + Claude setup guide, blendermcp.org, accessed 8 June 2026.
- Quick Start Guide, DeepWiki for ahujasid/blender-mcp, accessed 8 June 2026.
- Blender official download, Blender Foundation.
- uv installer documentation, Astral.
Written by
Mohamed AL-Kaisi
Editor-in-chief of the Data & AI Hub.